Workflow
Input data
We start with the train and test CSV files generated during the last step of the CCTV Preprocessing workflow. The train CSV contains train and validation frame details. The test CSV contains the portion of dataset kept aside for testing.
Along with the train and test CSV files, we need the unzipped training and testing blurred frames.
Going with Frame based (FB) or Video Based (VB) has to be decided in the Training Data Splitter step itself and should use the appropriate functions to generate datasets for FB or VB method.
The steps written here are specific to the compute-msi repository on the MSI server
Unzipping blurred frames bash script:
The bash script for extracting the blurred frames for a dataset is located in
/home/gqc/git/gqc/compute-msi/shell/extract_all_zips_in_a_folder.sh. This script extracts all the zip files from your specified folder into a destination folder specified.Paths to be set in
extract_all_zips_in_a_folder.sh:SOURCE_DIR: The directory containing the zip files to be unzippedDEST_DIR: The directory where the zip files stored inSOURCE_DIRwill be unzipped.
Training
Important
The name of the model being trained depends on the training/testing created by the cctv_cv notebooks and whether or not they are Frame Based or Video Based. Add _VB to the end of the name of the model if it is being trained on a _VB dataset. Similarly, add _FB to the end of the name of the mode if it is being trained on an FB dataset. The name of the model can be set by using the -r flag on localrunner.sh .
settings.py location: /home/gqc/git/gqc/compute-msi/sewer_ml/settings.py
While training a model using the localrunner.sh script menioned below, using tmux is necessary. tmux is extremely useful when running tasks that take up a lot of time over ssh, which in this case is training a CV model. Refer to the tmux documentation here to start a tmux session. After running the script to train the model, you can detach from the tmux session. If you want to check up on the progress of training the model, you can attach back into the last session by typing tmux a. To attach into a specific numbered session, you can use tmux a -dt <number of the session>.
Before starting to train the model, please specify the METADATA_DIR setting in the settings.py to point to the folder containing the train and test CSVs.
Also, please specify the IMGS_DIR setting in the settings.py to point to the folder containing blurred frames. The IMGS_DIR setting will be used by the fastai_multi_label_v3_generic.py to pull images for training.
Single-stage model
- Set the
TWO_STAGEsetting in the settings.py file to beFalsewhen training the Single-Stage model.
Run the script,
fastai_multi_label_v3_generic.pythroughlocalrunner.sh. E.g../localrunner.sh -s fastai_multi_label_v3_generic -r 123 -b 12 -e 10 -i train_val_simplified_SD1_114videos_from_80_20_split_v3_3 -m test_model -t test_simplified_SD1_114videos_80_20_split_v3Generating metrics and prediction using a single stage model.
infoThere are two ways to run inference using the
fastai_multi_label_predict.pyscript. You can specify the folder containing all the images to run inference on or if you want to be more explicit with which images to run inference on you can use a CSV file to specify the images.If you want to use the first option(folder containing all the images to perform inference on), please modify the
test_file_pathvariable to point to the folder containing the images.If you want to use the second option(using a CSV file to specify the images to run inference on), please modify the
test_csv_pathvariable to point to the CSV. You will also modify theIMGS_DIRvariable in thesettings.pyfile to point to the directory where the images specified by the CSV are stored.To generate metrics for the single stage model, run the
fastai_multi_label_predict.pyscript withlocalrunner.shas shown in the example:./localrunner.sh -s fastai_multi_label_predict -r 123 -b 64 -t test_simplified_SD1_114videos_80_20_split_v3Things to keep in mind: Inference runs fastest with batch size set to 64.
Flow of data for running predictions using fastai_multi_label_predict.py:
infoTo accurately compare the inference results of the trained model with the inspection data, it's essential to ensure both tables have a similar structure. The
splitting_frame_row_into_mult.pyscript is designed to restructure the frames table by splitting rows labeled with multiple defects into separate entries. This process guarantees that each row in the test table corresponds to a single defect. As a result, frames previously associated with multiple defects are now represented by multiple rows, each with the sameframe_idbut assigned to a different defect.
Two-stage model
For training a two stage model, you need to run nd_vs_defect_v1_generic.py for the first stage and fastai_multi_label_v3_generic.py for the second stage as directed in the instructions below. The two models can be trained in parallel. However, to execute the two-stage model for prediction purposes, the models must be run in series, where the results of the first model are concatenated with the second model to provide the final output.
First stage model: Binary prediction (
NDvs.Defectmodel)./localrunner.sh -s nd_vs_defect_v1_generic -r sd1_d_all_FB -b 12 -e 5 -i train_SD1_2023_05_26_FB -t test_SD1_2023_05_26_FB -m test_modelSecond stage model: Defect Prediction
Set the
TWO_STAGEflag insettings.pytoTrue.Train the model
./localrunner.sh -s fastai_multi_label_v3_generic -r sd1_d_all_FB -b 12 -e 5 -i train_SD1_2023_05_26_FB -m test_model -t test_SD1_2023_05_26_FB
Generate GQC metrics for two stage model
Set the
STAGE1_MODELin thesettings.pyfile. Set theSTAGE2_MODELfor-mparameter in the command../localrunner.sh -s cctv-multi-label-two-stage-approach_GQC_metric -b 12 -e 5 -r two-stage-defect-multilabel-SD1_D_all_label_FB -i train_SD1_2023_05_26_FB -t test_SD1_2023_05_26_FB -m cctv-second-stage-sd1_d_all_FB -u SD1Process flow of two-stage model
Memory usage dependency for the fastai_multi_label_v3_generic.py
The GPU memory used during training depends on the batch size specified above when using localrunner.sh. Some metrics related to batch sizes and GPU memory allocated are shown below:
fastai_multi_label_v3_generic.py: When setting the batch size to 12 and training a single stage model, 8GB of GPU memory is used.fastai_multi_label_predict: When setting the batch size to 64, 8GB of memory is used.
Corresponding WandB projects
Following are the WandB project names used for the listed kinds of different models.
These can be renamed. But will keep the current names for now to be consistent with run log history.
cctv-sd1-two-stage-model: Test set results over the ensemble of two-stage modelscctv-sd1-defect-multilabel: Stage 2 model training of two-stage ensemblecctv-sd1-singlelabel: Stage 1 model (binary model) training of two-stage ensemblecctv-sd1-multilabel: Multi-label model training
- To monitor GPU usage you can use watch nvidia-smi on the command line. If nvidia-smi doesn't work, you might have to reboot the system.
Location of models on VS_Research:
The trained models are stored in /media/gqc/unionsine1/VS_Research/CCTV/models/.
Flags affecting model creation in fastai_multilabel_v3_generic.py
Some statistics with respect to training a Single Stage model:
Single Stage Models were trained with the SD1/2023_05_26 dataset. Here are some statistics realted to training them:
- Single stage model trained on a single video group (Video group name: 01202023) This model was trained using the 01202023 video group in the SD1/2023_05_26 dataset with a Video Based (VB) split basis. The training data consisted of 7492 frames and the test data consisted of 1873 frames. The time it took to train this model was 24 minutes with 8GB out of the 12GB of memory being used by the GPU.
[10/24/2023] Proposed Organization modifications for seamless integration with previous stages
Current flow
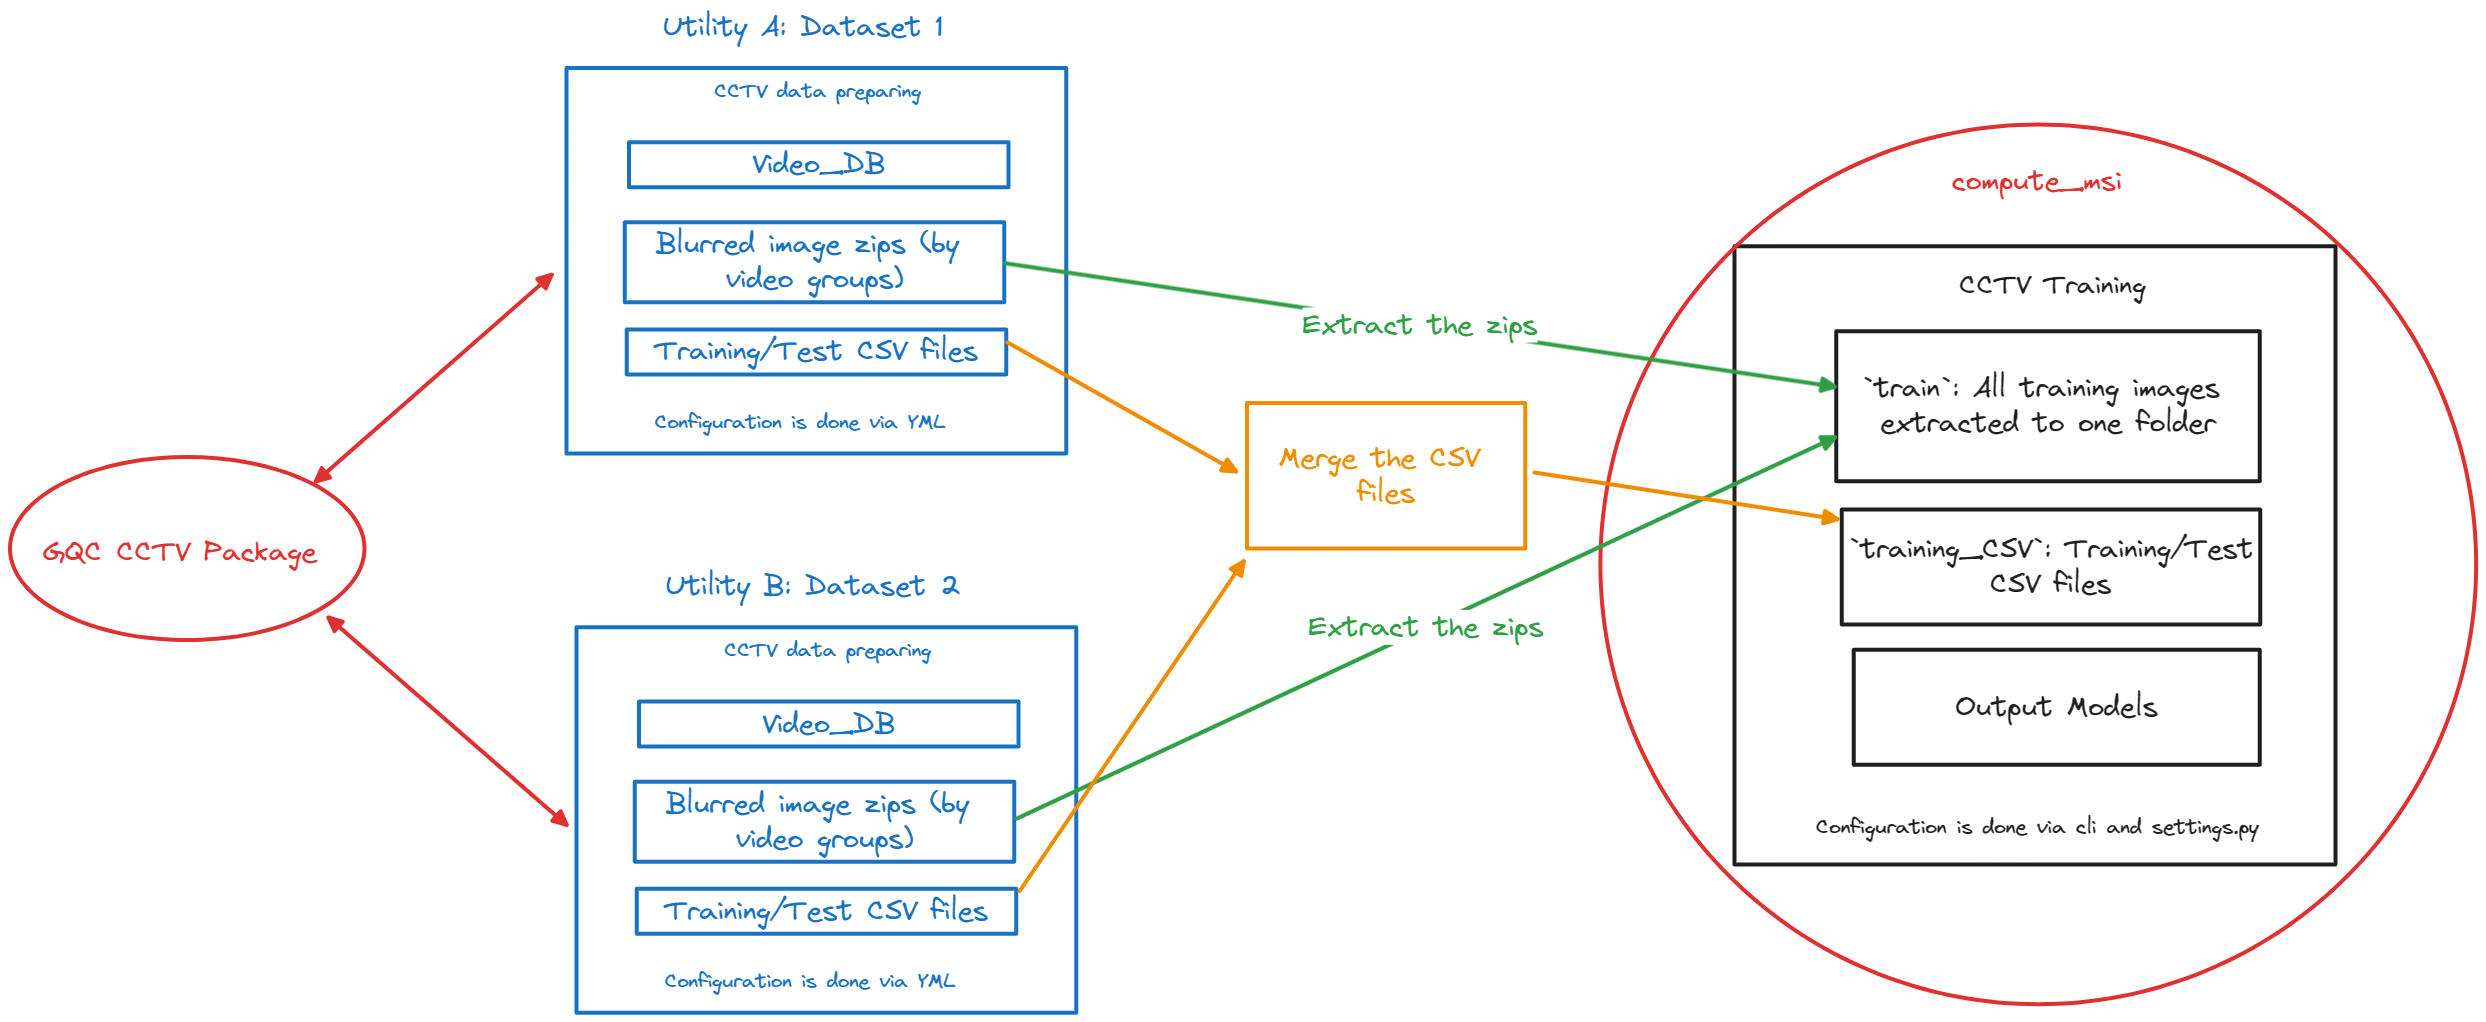
Current input data for the training stage of the CCTV pipeline:
BlurredJPG frames zipped based on the video groupTrainandTestCSV files generated from theTraining Data Splittersection.- Columns:
fname,data_type,labelsfname: Name of the frame with extention. No absolute or relative path is included.data_type: Type is assigned astestandtrainlabels: Assigned label
- Columns:
They will reside under:
CCTV<UTILITY>Data<Dataset_name>Blurred_Frames: Blurred and zipped frames based on groupsTraining_CSV:TrainandTestcsv files
Current input data for the training scripts
- Configuring via
cliandsettings.py. - All training frames are needed to be copied over to
compute_msi/sewer_ml/`traindirectory. - Training/Testing csv files are needed to be copied over to
compute_msi/sewer_ml/training_CSVdirectory. - Models are written out to
compute_msi/sewer_ml/outputs/
- Configuring via
Required changes
- If we are to read directly from the blurred frames from the zips,
training scriptsneed to read directly from zip files.- It will be possible by passing the zip object path and the image name to load to the
get_xfunction which is called per image basis. - Need to account for the performance impact over this.
- It will be possible by passing the zip object path and the image name to load to the
- Replacing training and test csv files with DB tables.
- Training csv and test csvs can be saved as DB tables itself on
Video_DBs of each dataset. Then the training script needs to be instructed to read both DBs and corresponding tables. - Or the DB tables need to be merged directly as a new DB.
- Other options?
- How to change train and test split? May be have a separate DB for the training side?
- Table naming conventions
- Training csv and test csvs can be saved as DB tables itself on
Discussion outcomes
- We should have a global database (which can sit under
CCTV/CCTV_DB.db) to save all utility and dataset information. - Change the table names to have the
utilityanddatasetas prefixes. - Integrate the test and train data split into the
compute_msirepo itself. - Read directly from the zipped files. (See the performance impact over that)
- Naming conventions for training_and_test_data_tables.